Menu
Your cart is empty
Looks like you haven't added anything to your cart yet

Each KIT includes your choice of :
Not sure how to order? Click here.- Post Connection (Post Saddle or Brackets)
- Plate
- Auger
Don't Need a complete kit? Check Out our Post Saddle, Load Plate, Auger, Bracket
For a clean finish with the Tall Boy Post Saddles, use our Titan Coupling Bolts.
NOTE: For 48" augers, use a 1/2" six-point socket to drive the auger into the ground
GOT QUESTIONS?
Like what type of post connection? What kind of load plate? What length of auger?
Watch this video and learn the quick and dirty stuff you need to know to get your project moving forward with confidence.
Have more Questions on frost?
HOW IT WORKS

DRIVE
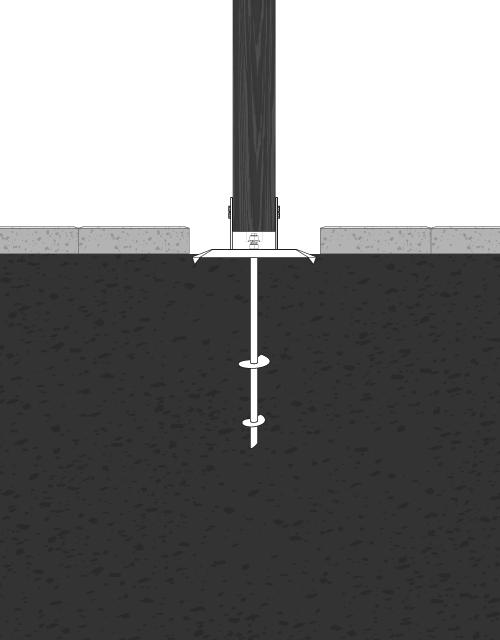
Using a lightweight handheld ½" electric impact wrench and a 12mm six point socket, drive the auger deep into the soil.
TIGHTEN
Tighten the nut and compress the load plate against stop washer below the load plate.
ATTACH
Place the post saddle in the desired location. Tighten the upper nut to attach the saddle to the auger and load plate.
EASILY DRIVE IN OR OUT
It's dependable Direct Drive system ensures you can drive the auger forward or reverse for quick installation. Installs with a handheld ½" impact wrench or hand auger tool if you prefer a manual installation.
- Turn a week-long job into a weekend project.
- Save money on labor, materials and time.
- No sledge or jackhammers or heavy machinery.
- Install in the morning and build in the afternoon.
*For floating or free-standing structures where freezing soil conditions exist.
HERE IS HOW TO ORDER

CHOOSE POST CONNECTION
(Post Saddle or Brackets)
Shorter saddles are most common for supporting decks. Taller saddles are more popular for pergolas or taller structures where appearance matters more.
Pergola Brackets are designed for non-standard sized wood or metal posts that screw directly to our Load Plate.

CHOOSE PLATE
Convex plates are used for direct ground contact and the Flat plate over pavers. The dog ear corners of the Convex plate grip and compact the soil firmly. The Flat plate sits tight and flush to paver bricks or other hard surfaces.

CHOOSE AUGER
The 24" is best for low level decks or where soil conditions may not be suitable for a longer auger. The 36" is better for decks 3'-6' tall, pergolas or on slopes. The 48" is best for maximum uplift or in sandy soil. Either way, we still refer to the Deck Foot Anchor as a non-frost footing out of an abundance of caution because of the large load plate resting on the surface.
Go to Top of PageLOW OR HIGH ELEVATION DECKS
GROUND LEVEL
You can build your deck with joists as low as 2"-3" above grade if you wish. Simply hang the joists from the perimeter joist. If you want to extend the deck beyond the footing, extend the side perimeter joists 6"-10" and fill with blocking joists along the length.
EASILY UP TO SIX FEET
With proper bracing in both directions from 6x6 posts to beams, you can make a six-foot high freestanding deck as solid as a rock. It's possible to go even higher but it is not intended to support decks at a second-floor elevation.

HOW MANY FOOTINGS DO I NEED?
The Rule of Thumb is 6'-0" apart for each footing. This corresponds to a design load of 50 psf and tributary areas over each footing of 36 sqft.
So the total load imposed on the soil below each footing would be a maximum of 1800 psf as the footing is just slightly larger than 1 sqft.
If you have a large deck where three or more beams are going to be used, consider adding one additional footing along the interior beam. This is because the tributary loads of any structure are always greatest in the middle.


HOW DOES FROST AFFECT THE ANCHOR?
The Deck Foot Anchor™ does not heave up from the ground like a fence post that is literally popped out of the ground a little bit each year. The Deck Foot Anchor ™ remains anchored to the ground and moves with the soil as it expands up or settles down during freeze or thaw cycles.
The Deck Foot Anchor is not a frost footing and falls under Section R403.1.4.1. Exception 4(IRC) and Section 9.12.2.2.(7) (NBC). Therefore it is recommended for use with freestanding decks, unless the soil does not freeze in your area.

WILL AN AUGER WORK IN MY SOIL?
Some soil is not well suited for augers. The soil may be full of rocks, roots or other obstructions.
The Deck Foot Anchor™ can be retracted easily enough and there is some latitude with where to choose to install each footing.
If you're unsure about your soil conditions, we recommend using our Deck Foot Anchor - Test Kit for accurate results. This kit will help you assess soil composition and confirm compatibility with our augers before you buy, giving you confidence in your foundation choice.
CONVEX PLATE FOR GROUND CONTACT
- Install the auger and plate.
- Mark the post location with tape.
- Place post brackets along the edge of the tape.
- Drive metal drilling screws through the brackets and the plate.
- Remove the brackets and the tape.
- Put the brackets over the holes in the plate and drive the screws home.
- Put the post in place and drive screws through the brackets to secure it.


FLAT LOAD PLATE OVER PAVER STONES
Our new flat load plate allows simpler installations over pavers or stone. Pairs perfectly with our Shorty or Tall Boy style Post Saddles.
- Remove enough pavers to allow the helical blade to clear.
- Load plate rests on a hard surface.
- Also useful over asphalt.
USING THE DECK FOOT ANCHOR WITH PAVER STONES
Remove enough pavers to allow for the Convex load plate to fit.


Remove just enough pavers to allow the auger blade to pass through and use the Flat load plate.


USING VARIABLE SIZE WOOD OR METAL POSTS

The pergola post brackets can be used with a wide range of different post sizes. Posts can be wood, metal, hollow or with closed bottoms.
When using a solid wood post or a closed bottom metal post, an access hole for the drive head of the auger must be bored into the post (1-3/4" to 2" dia.).
A common bi-metal hole saw can be used to cut a hole in the flat bottom of metal post. This hole allows the drive head of the auger to reside inside the post.

FLAT PLATE ON PAVERS

Remove enough pavers to allow the 3-¼" blade to clear and drive it into the ground.
Mark the post location with masking tape and align the brackets with the edge of the tape.

Place the brackets on the edge of the tape where the post walls are located.
Metal drilling screws are driven through the brackets and the plate to mark their position on the pavers below. This ensures the brackets and screw locations are perfectly registered on the pavers.
If self-drilling screws are not drilling easily, drill pilot holes first with a metal drill bit.

FLAT PLATE

Remove the screws and plate, and now drill the marked holes with a masonry bit to a depth of 1". This allows the metal screws to sit in the cavity within the pavers.
Place the plate back on the pavers, remove the tape, and screw the brackets securely to the plate. You will have a perfect fit.
Put the post in place and drive screws through the brackets to secure it.
The footing is firmly anchored into the ground by the helical blade and the posts are securely connected to the heavy metal load plate.

WHAT IS TERRA-SHIFT™
Terra-Shift refers to our unique friction release system in the bracket that protects critical post to beam connections on your deck in the event of any seasonal soil movement.
If any uneven uplift forces are imposed on your footings, posts will slide up or down independently as needed to protect and preserve the post and beam joints from separating.
TESTED TO A MINIMUM OF 19,000 POUNDS!
Independent compression load testing has confirmed that each Deck Foot Anchor can support a minimum of 19,000 pounds.
This is far more than your soil will ever support. So the Deck Foot Anchor is not the weakest link. Your soil bearing capacity is the limiting factor.

COMPRESSION
POST SADDLE COMPRESSION LOAD
TESTED BETWEEN 15,000 to 19,000 POUNDS.
Lab tests showed the 4x4 and 6x6 saddles supported up to 15,000 and 19,000 lbs respectively.
This is more than your soil will ever support.
The Deck Foot Anchor is not usually the weakest link. Your soil bearing capacity is usually the limiting factor.
AUGER COMPRESSION
Here are the data from the compression tests of the auger in the best and worst type of soil.

UPLIFT

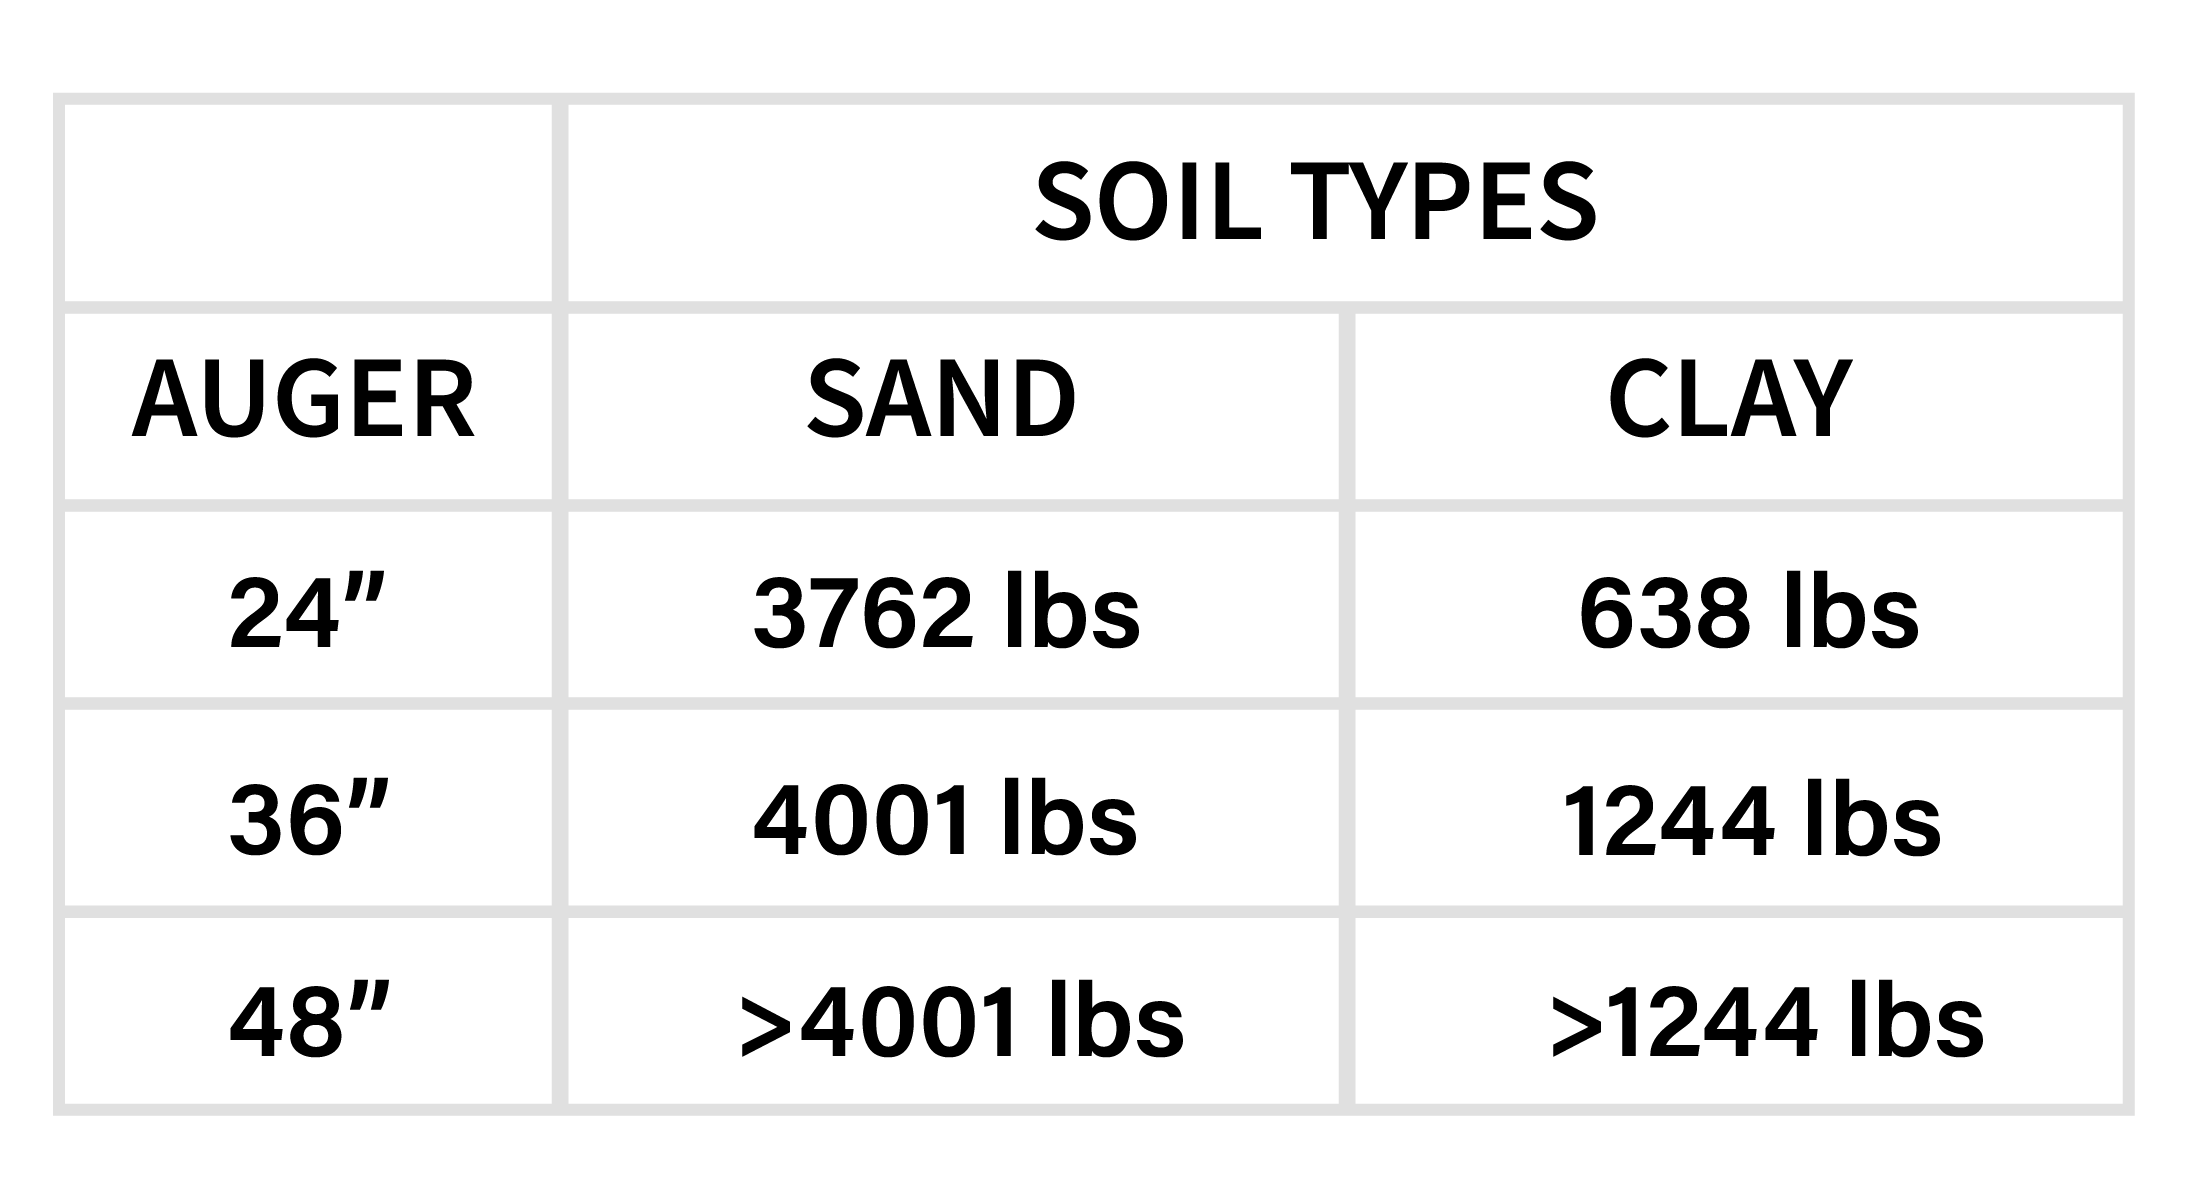
Pull out resistance (tension) from undisturbed soil varies by soil type and auger length. If you are building a project where known uplift data is required please see our Tension Test data for sandy or clay soils based on auger length.
This is data taken from field testing by Intertek in a location in Colorado and is part of an extensive residential code compliance review program this is expected to be completed in 2022.
TERRA-SHIFT: A SHOCK ABSORBER THAT PROTECTS YOUR DECK
Watch this demonstration of how the patented Terra-Shift system works to relieve stresses that may build up during seasonal changes and threaten the integrity of your deck structure.
Regardless of the harshness of your climate, the post to beam connections supporting your structure will remain strong and sturdy.
AUGERS AVAILABLE IN 24" OR 36" LENGTHS
Use the 24" for most applications. Use the 36" auger when you want more wind uplift resistance or you are building on a slope. The auger length will make no difference how the Deck Foot will perform in frost as the above animation shows.
The deck will always be resting on the surface and will rise or descend marginally with the soil expansion and contraction. But it will always remain securely anchored to the ground.
SECURELY ANCHORED: READY FOR HIGH WINDS

Decks supported by concrete blocks that rest on the surface are susceptible to uplift in high winds and have to be secured to the ground with a webbing of cables and ground spikes.
The Titan Deck Foot Anchor™ holds your footings securely to the ground. Almost 2/3 of the United States and parts of Canada are in high wind zones.
For maximum uplift resistance, consider using the 36" auger.
DIMENSIONS


USE OUR IMPACT SOCKETS
Our 12mm high impact six point socket is designed to grip the hexagon drive head without stripping no matter the load.
This tiny investment can save headaches on the job site. If you use a low quality twelve point socket that does not fit as well, you are more likely to strip the drive head while under maximum load.
PRODUCT INSTALLATION GUIDES

Deck Foot Anchor Instructions
Grab a copy of our installation guide and use it to help plan your project.
Pergola Post Bracket Instructions
Pergola Posts from Kits often vary in size. These brackets will work with virtually any of them. Grab a copy of this installation guide and use it to help plan your project.
It's full of easy to understand illustrations to help you every step of the way.


Deck Foot Anchor Troubleshooting Guide
The Deck Foot Anchor for floating structures (non-ledger attached) gives you strength and security similar to a poured concrete footing without the labor, time and cost.
This guide provides users with solutions to common issues, enabling them to resolve problems independantly.
WARNING: Your experience with the Deck Foot Anchor is entirely dependent on your soil type. Rocks or roots or a weak impact wrench can prevent the auger from driving fully into the soil and an improperly sized socket can strip the driver head. Continuous torque for an extended period of time on the auger, once it has been stopped by a rock or immobile obstruction, can destroy the auger. The footing does not provide any significant lateral load resistance and should be used for compression load applications only.
- Choosing a selection results in a full page refresh.


